At Nuage Networks we needed a solution to test our Cappuccino application. We now have two different suites of tests: unit tests and functional tests.
OJTest satisfies all of our needs for unit-testing. We found a large number of examples in Cappuccino itself to do what we wanted to do.
For the functional tests, we decided that Cucumber would be well suited to our needs. We took a look at Cucapp and improved it. Guess what, it’s awesome! Let me explain how Cappuccino and Cucumber can work together.
Philosophy of Cucapp
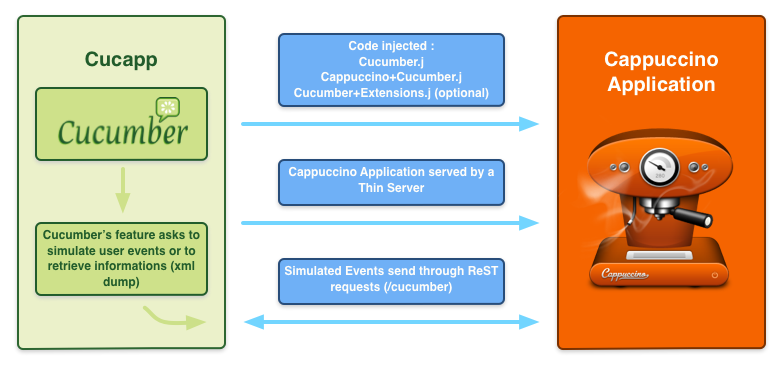
Cucapp is an interface between Cucumber and Cappuccino. The Cappuccino application is served by a Thin server and a small piece of code is injected into the Cappuccino application. This piece of code connects the Cucumber scripts and the Cappuccino application via Ajax requests.
Once Cucumber was able to talk to our Cappuccino application, we wanted to simulate what a user could do with the application. Our first thought was “Wow, a user can do whatever she wants, there are unlimited possibilities”. But in reality, he can only do a small number of things:
- He can hit some keys on his keyboard.
- He can do basic actions with his mouse (left click, right click, moving etc…).
And that’s it! Our first job was to create new features in Cucapp for simulating a user’s action in our Cappuccino application. Then, we added some features to help us easily launch our tests.
Cucapp’s features
Environment variables
Cucapp provides a set of environment variables:
-
$CUCAPP_PORTallows you to specify the port used by the Thin server. -
$CUCAPP_APPDIRECTORYallows you to specify where the Cappuccino application is located. -
$CUCAPP_BUNDLEallows you to specify if you want to use the compiled version of Cucapp. -
$CUCAPP_APPLOADINGMODEallows you to specify which version (buildordebug) of your Cappuccino application you want to test.
Core of Cucapp
The file Cucumber.j and Cappuccino+Cucumber.j (injected in the tested application) are the core of Cucapp. It’s in these files that the relation between Cucumber and Cappuccino is made. What do these files do?
-
Cappuccino+Cucumber.jcontains a category of the classCPApplication. The category adds the method- (CPString)xmlDescription. This method creates a XML dump which contains a reference of eachCPResponder(basically a Cappuccino widget) currently displayed. In the XML, eachCPResponderis associated to aXPath. This unique XPath, which is a string (automatically generated from a CPResponder’s title, identifier etc… or manually with acucappIdentifier), will be used in yourtest/featuresto target a specificCPResponder. - The file
Cucumber.jcontains the classCucumberwhich serves the URI/cucumber. - The class
Cucumberhas a set of methods for simulatingCPEvent. - When launching a test, Cucapp will send a
POSTrequest to/cucumberwith some data. This data contains information that the Cappuccino application will interpret. Basically, this data will be the name of a method (and its params) to call. This is also used to retrieve the XML dump of the Cappuccino application.
Cucapp in action
Here’s an example of the simulation of a left click on a button.
Firstly, we create a feature which contains a simple scenario (these are cucumber features, you should take a look here)
Scenario: Open the popover with a click on the add button
    Given the user makes a left shift click on the add button
And then, we create our ruby step:
Given /^the user makes a left shift click on the add button$/ do
  # Make sure the button with the title add is currently displayed
  app.gui.wait_for            "//CPButton[title='add']"
  # Simulate a left click with the shift key presssed
  app.gui.simulate_left_click "//CPButton[title='add']", [$CPShiftKeyMask]
end
As you can see, the simulate_left_click method contains two parameters:
- The first one is the
XPathof the button. - The second one is an array of the key masks you want to simulate (for example
$CPCommandKeyMaskand/or$CPShiftKeyMask). All of these masks are available in Cucapp inlib/encumber.rb.
And this is it, simple as that! You’ve just simulated a left click on the button with the title “add”.
What does Cucapp do for you?
Once you tell Cucumber to simulate an event, Cucapp does the rest for you. It sends a request on /cucumber to simulate a left click on a button. The data of the request consists of the name of the method (simulateLeftClick:) to use for the simulation and additional options (the shift key is pressed).
Also, between two simulated events, Cucapp will automatically generate several CPMouseMoved events simulating movement between the two event locations.
This is the Objective-J method called in our Cappuccino application (this method is injected automatically by Cucapp, it comes from the file lib/Cucumber.j):
- (CPString)simulateLeftClick:(CPArray)params
{
    var obj = cucumber_objects[params.shift()],
        locationWindowPoint;

    if (!obj)
        return '{"result" : "OBJECT NOT FOUND"}';

    if ([obj superview])
        locationWindowPoint = [[obj superview] convertPointToBase:CGPointMake(CGRectGetMidX([obj frame]), CGRectGetMidY([obj frame]))];
    else
        locationWindowPoint = CGPointMake(CGRectGetMidX([obj frame]), CGRectGetMidY([obj frame]));

    [self _perfomMouseEventOnPoint:locationWindowPoint toPoint:nil window:[obj window] eventType:CPLeftMouseDown numberOfClick:1 modifierFlags:params[0]];

    return '{"result" : "OK"}';
}
Helpers
Two categories are used in Cucapp to help you to add new things and to tweak Cucapp for your convenience:
CPResponder+CuCapp.jcontains a category ofCPResponder. It adds the method-(void)setCucappIdentifier:. ThiscucappIdentifiercan be used to identify the control with its XPath. You need to include this category in your Cappuccino application to use cucappIdentifiers. With that, you can use an XPath such as//CPButton[cucappIdentifier='cucappIdentifier-button-bar-add']and identify everyCPResponderas you wish.Cucumber+Extensions.jwill be loaded (optionally) by Cucapp when launching Cucumber. It allows you to add new Cappuccino methods needed for your own tests (for instance a method to check the color of aCPView). This file has to be located infeatures/support/Cucumber+Extensions.j.If your application implements the category
CPResponder+CuCapp.j, you can load a CLI mode of Cucapp, explanation below.
Simulate user events
Cucapp provides a set of methods to simulate user events in your cucumber tests:
def simulate_keyboard_event charac, flags
def simulate_keyboard_events string, flags
def simulate_left_click XPath, flags
def simulate_left_click_on_point x, y, flags
def simulate_double_click XPath, flags
def simulate_double_click_on_point x, y, flags
def simulate_dragged_click_view_to_view XPath1, XPath2, flags
def simulate_dragged_click_view_to_point XPath1, x, y, flags
def simulate_dragged_click_point_to_point x, y, x2, y2, flags
def simulate_right_click XPath, flags
def simulate_right_click_on_point x, y, flags
def simulate_scroll_wheel XPath, deltaX, deltaY, flags
def simulate_mouse_moved_on_point x, y, flags
CLI
If your application implements the category CPResponder+CuCapp.j, you can use Cucapp in CLI mode. To use it, you need to follow the following steps:
Open your application in a browser and open the JavaScript console.
Call the function
load_cucapp_CLI(path). The path argument represents the path of the fileCucumber.j. Once you see a message that Cucapp is loaded, you can start to use it.
Now you can use the following functions in the console:
function simulate_keyboard_event(character, flags)
function simulate_keyboard_events(string, flags)
function simulate_left_click_on_view(aKey, aValue, flags)
function simulate_right_click_on_view(aKey, aValue, flags)
function simulate_double_click_on_view(aKey, aValue, flags)
function simulate_left_click_on_point(x, y, flags)
function simulate_right_click_on_point(x, y, flags)
function simulate_double_click_on_point(x, y, flags)
function simulate_dragged_click_view_to_view(aKey, aValue, aKey2, aValue2, flags)
function simulate_dragged_click_view_to_point(aKey, aValue, x, y, flags)
function simulate_dragged_click_point_to_point(x, y, x1, y2, flags)
function simulate_mouse_moved_on_point(x, y, flags)
function simulate_scroll_wheel_on_view(aKey, aValue, deltaX, deltaY, flags)
function find_cucappID(cucappIdentifier)
For instance, if you want to simulate a left click on a button which has a title set to login, you would enter this:
load_cucapp_CLI()
simulate_left_click_on_view("cucappIdentifier", "button-login", [])
Demo
A full demo of what Cucapp can do is available here.
Updated on the 22nd of September, 2014 with additional information.
Updated on the 19th of October, 2014 with additional information.
Follow me on @WilhelmAlex or github.
