In this tutorial we will be covering the automatic layout techniques used in Cappuccino with autoresizing flags. We’ll learn how to build simple and complex layouts that change appropriately as the user changes their size. Download the sample code below to follow along with the examples provided later in this lesson.
Cappuccino defines a variety of ways to manage the layout of views. Some
views, such as CPCollectionView and CPSplitView, manage the layout of
their internal views for you. But often times you will want to implement
your own custom layout. Cappuccino makes it very easy to size and
position views, but it is then up to you to also handle resizing and
repositioning them as changes occur. One option in this case is to
implement the resizeSubviewsWithOldSize: method provided in CPView that
gets called on a view every time it changes size. From here, you can
rearrange all your subviwews however you see fit. Alternatively, you can
implement resizeWithOldSuperviewSize:, which gets called every time a
view’s superview size gets changed. In this case, it is up to the
subviews to rearrange themselves. However, both of these methods are
quite tedious and a bit overkill for most layout tasks.
This is where the autoresizing flags in Cappuccino and automatic layout come in. The central idea behind automatic layout is that relayout takes place in response to a parent view changing size. Thus, you can think of automatic layout with autoresizing flags as a “recursive” process. Instead of creating container views that are responsible for keeping their views appropriately arranged, autoresizing flags allow each each individual view to describe how it would like to resized and repositioned relative to the changes taking place in it’s superview. In this way, as each view changes size, the resizing and repositioning is “cascaded” down. This does away with a lot of complexity of uneccessary “manager” views and controllers that can make UI programming quite difficult. The key to remember when using autoresizing flags is that the views in question do everything based solely on what happens to their superviews. If you keep this in mind, you will find that many seemingly complex layouts can be expressed quite easily.
To use automatic layout we will be using the setAutoresizingMask: method
defined in CPView. To use this method, you will have to familiarize
ourselves with the concept of “masks”. Masks are just variables that can
be OR'ed together to create more complex descriptions. Cappuccino uses
masks to represent each of the different layout values. For example, if
you wanted a view to use both the CPViewWidthSizable flag and the
CPViewHeightSizable flag, you can put them together with the | operator
like so:
[myView setAutoresizingMask:CPViewWidthSizable | CPViewHeightSizable];
You can then retrieve the mask by using the autoresizingMask method.
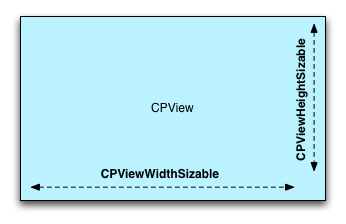
The two flags that control how a view resizes are CPViewWidthSizable and
CPViewHeightSizable. By setting your view with these flags, you tell it
to grow and shrink with the containing view:
A good example of this would be when you want a view to remain the exact same size as its superview. In this case, you want to use both of these flags together:
[view setFrame:[[view superview] bounds]];
[view setAutoresizingMask:CPViewWidthSizable | CPViewHeightSizable];
Here you can see a very common design pattern in Cappuccino layout.
We’ve started by arranging the views the way we want them to currently
be, and then defined how they should adjust when changes take place.
Since we wanted the view in question to follow the size of its
superview, we first set its frame to be equal to the superview’s bounds.
We then set both the CPViewWidthSizable and CPViewHeightSizable flags so
that as the superview grows the view does as well.
Setting up how a view repositions itself is slightly more complex, as
there are four different flags that control this behavior:
CPViewMinXMargin, CPViewMaxXMargin, CPViewMinYMargin, and
CPViewMaxYMargin. These four flags represent the four regions around the
view: left, right, top, and bottom, respectively. By setting any one of
these flags, you are specifying that you want this area to be
“flexible”, and stretch and shrink with the superview:
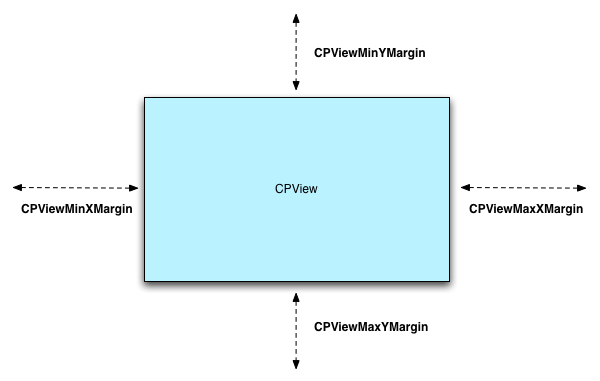
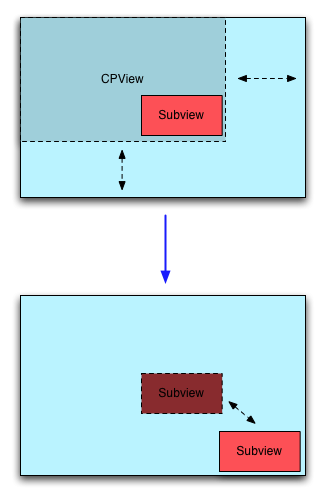
An alternative way to think of this is that by not setting these flags, you are specifying that that particular area around the view should remain constant. A good example of using these flags is when you want to center a view. In this case, we want flexible space all around the view so that it stays put in the center:
[view setFrameOrigin:CGPointMake(centerX, centerY)];
[view setAutoresizingMask:  CPViewMinXMargin |
                            CPViewMaxXMargin |
                            CPViewMinYMargin |
                            CPViewMaxYMargin];
Notice that just as before, we begin by placing the view where it should
go. Here centerX and centerY are assumed to be precomputed values. After
this is done, we set the four flags, which will keep the view in the
center as the superview grows and shrinks. This is completely
deterministic and will work in every browser.
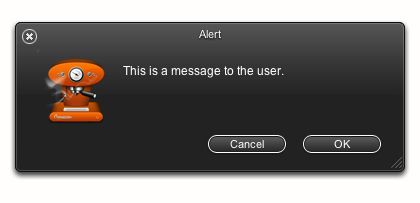
Now that we’ve got the basics down, let’s move on to some more real
world examples. A good place to start is with the classic alert dialog.
In this case we have four elements that we want to be laying out: an
icon, a text blurb, and two buttons:
We begin by looking at each of these elements independently and see how they should reflow as the window changes size. The icon on the left is easy, it should stay tied to the top left. If you recall from before, another way of saying this is that it should only have flexible space to its bottom and right:
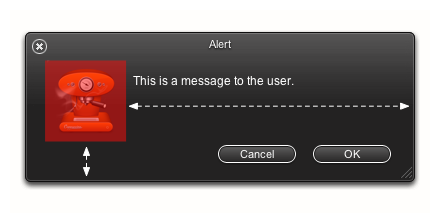
And so, we should use both CPViewMaxXMargin and CPViewMaxYMargin:
[iconView setAutoresizingMask:CPViewMaxXMargin | CPViewMaxYMargin];
The text blurb is also quite simple, as it should simply grow along with the window:
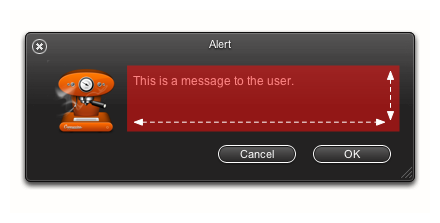
Since we want it to stretch in both directions, we’ll use
CPViewWidthSizable and CPViewHeightSizable:
[textField setAutoresizingMask:CPViewWidthSizable | CPViewHeightSizable];
Now, the buttons on the bottom are actually almost the same case as the icon on the top left. The only difference is that we want the buttons to stay glued to the bottom right:
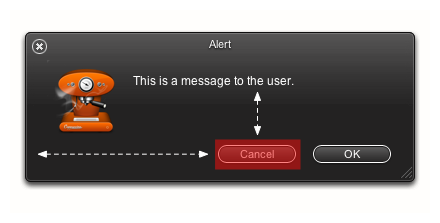
So naturally we will want to use CPViewMinXMargin and CPViewMinYMargin:
[cancelButton setAutoresizingMask:CPViewMinXMargin | CPViewMinYMargin];
[okButton setAutoresizingMask:CPViewMinXMargin | CPViewMinYMargin];
If you’ve downloaded the accompanying code you can go ahead and try this out for yourself. You’ll see that the window now resizes appropriately, with each of the individual subviews moving accordingly.
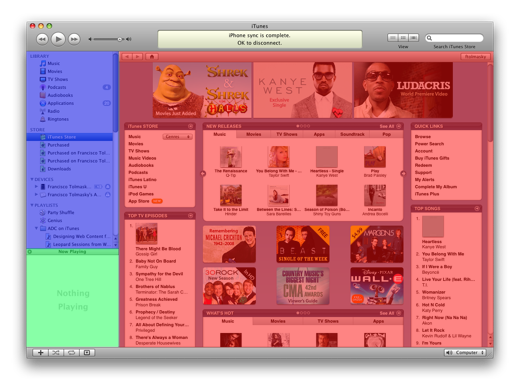
Let’s now move to a slightly more complicated example by taking a look at iTunes:
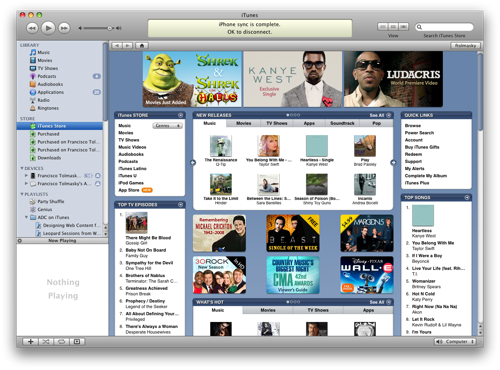
Although there seems to be a lot going on here, if we take a 10,000 foot view we can split up most the elements in iTunes into three generic portions: a file listing or “navigation area” on the left, a “content area” on the right, and a small “meta data area” on the bottom left:
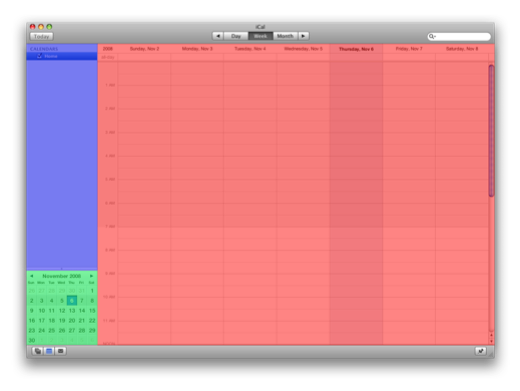
Once we’ve broken it down like this, we can see that in fact many applications use this general layout. For example, iCal is almost identical in this sense:
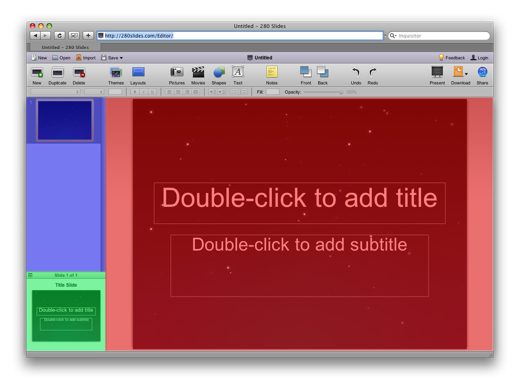
As was 280 Slides:
Again, we can quickly tackle this behavior by examining each individual view independently and seeing how it should resize on its own:
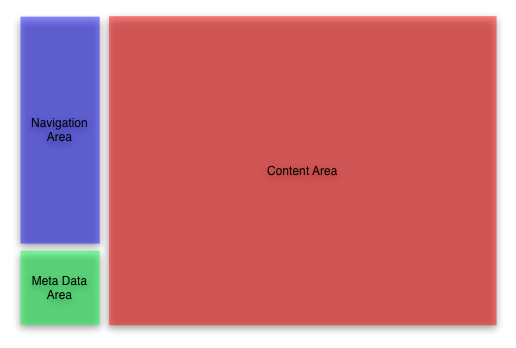
Now, the navigation area only resizes vertically, but also allows for flexible space on its right:
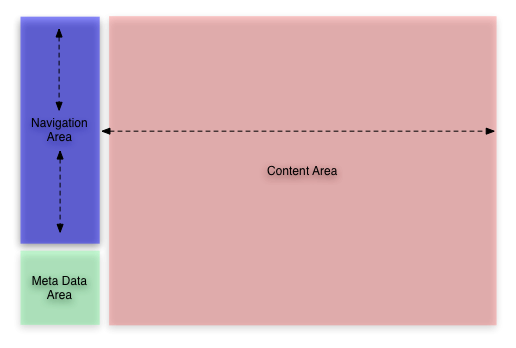
So for the first time, we will combine our sizing and positioning flags
and use CPViewHeightSizable alongside CPViewMaxXMargin:
[navigationArea setAutoresizingMask:CPViewHeightSizable | CPViewMaxXMargin];
The content area on the other hand is quite simple, as it just grows and shrinks with the containing window, something we’re quite familiar with handling now:

Just as before, simply use CPViewWidthSizable and CPViewHeightSizable:
[contentArea setAutoresizingMask:CPViewWidthSizable | CPViewHeightSizable];
Last but not least, the “meta data area” on the bottom left should stay anchored there:
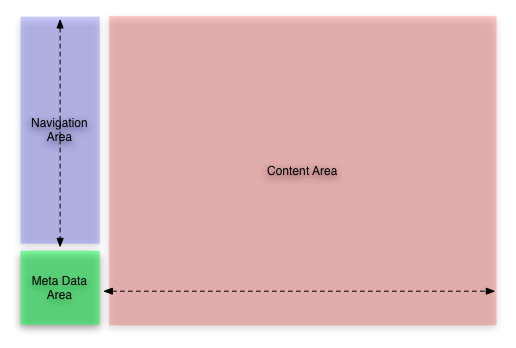
So, quite similar to the icon and buttons in the last example, just use
CPViewMinYMargin for flexible space above it, and CPViewMaxXMargin for
flexible space to the right:
[metaDataArea setAutoresizingMask:CPViewMinYMargin | CPViewMaxXMargin];
After this, the general layout should work. It seems a bit anticlimactic, but that’s because relatively complex layouts can be expressed quite simply with these flags.
As you can see, despite being quite simple, autoresizing flags can
create a wide variety of different layout behaviors. Chances are you
will be able to describe most if not all the complex resizing behavior
in your application just with a few calls to setAutoresizingMask:,
allowing you to avoid having to program time consuming UI management
code.

![]() Logo by Sofa. Hosted by SlevenBits. Copyright © 2013-2019 - Cappuccino Project.
Logo by Sofa. Hosted by SlevenBits. Copyright © 2013-2019 - Cappuccino Project.