After the creation of Objective-J, one of the first things Francisco did was write a new mode for his favorite text editor, SubEthaEdit. It was immediately obvious that we should try to make our favorite development environment as productive as possible.
A lot of people working with Cappuccino are coming from the Cocoa world, which means they’re almost universally developing in Xcode. We’ve had several requests for writing tools to integrate well with Xcode, but we just haven’t had the time. Thankfully one of our users, Raphael Bartolome, took it upon himself to build a great new Xcode plugin specifically for Cappuccino!
If you’re an Xcode user, go ahead and download the plugin now, and we’ll take a look at how it works. When you first launch the installer package, you’ll be greeted with a welcome screen. Click continue, and you’ll be presented with three options:

You should make sure the first option is checked, so that the build tools will be installed. Be aware that this will overwrite any existing build tools installation, so if you’ve installed tools off trunk, you may want to uncheck this. The second choice will pull the latest source from GitHub for creating new projects, and the final option installs all the Xcode extras that you’ll want on your system.
Once you’ve finished installation, open Xcode, and go the new project wizard (cmd-shift-n). Choose “Web” under Mac OS X on the left hand side, and you’ll see two Cappuccino Project templates.
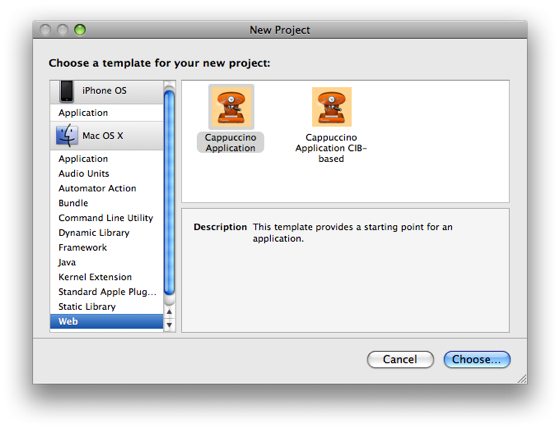
The first option is an empty project that puts “Hello Cappuccino” on the screen using a CPTextField, just like NewApplication in the Cappuccino starter package. The second creates a project that includes a “CIB”, the Cappuccino Interface Bundle. CIB based applications are not yet supported, so this won’t be useful to most people just yet, but if you’ve been playing around with nib2cib, or are developing CIB technologies, you may want to use this template. Once you’ve selected your template, go ahead and finish creating the project. You’ll be greeted with a new Xcode window that looks something like this:
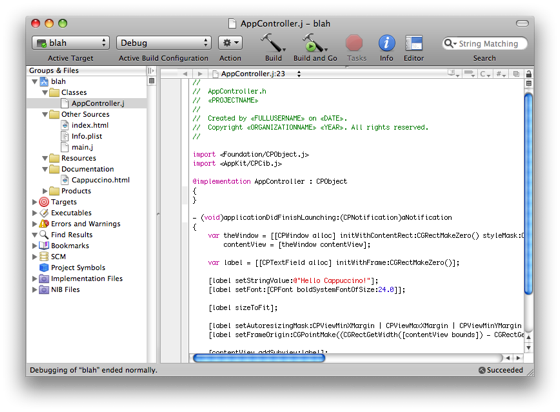
You’ll find AppController.j in the Classes folder, and your other, mostly standard, files in Other Sources. Even the documentation is directly accessible in the navigation on the left, to help you look up API questions and get answers quickly. Finally, the coolest part of all – click Build & Go, and you’re Cappuccino project will automatically be bundled together and loaded in your default Browser.
Now you can edit in style with syntax coloring, (basic) code completion, and many of the other powerful features Xcode offers. Thanks again to Raphael for this exciting contribution to Cappuccino! If there’s some feature you’d like to see in the next version of the plugin, post it to the comments.
Update: I should have mentioned that it requires Xcode 3.1. The developer is working on support for earlier versions.
