Cucapp is a framework which allows you to create tests in Cucumber for testing your Cappuccino Application. Cucapp can be used either for unit-testing or functional testing. It can be used in a black, grey or white box testing environment.
By default Cucapp will launch the Firefox browser when running the tests. Generally a headless browser like phantomjs will work better though.
When launching your tests with Cucapp, the Cappuccino application is served via a thin web server and a small piece of code is injected. This code connects back to your Cucumber script via AJAX requests.
Cucapp provides an abstract layer of steps to simulate actions and check values of control.
Cucapp and its source code is available here.
If you haven’t installed Cappuccino from source, please follow the tutorial Advanced: Install from Source.
Cucapp is a separate install on top of Cappuccino. Let’s set that up next.
Info Ruby needs to be installed on your system. RVM is a good choice which allows you to easily manage a Ruby environment.
To get started, download the current version of Cuccap:
git clone git://github.com/cappuccino/cucapp.git
Then install Cucapp on your system:
cd cucapp
jake install
When installing Cucapp, the following Ruby gems are going to be installed: Cucumber, Thin, Nokogiri, JSON and Watir-Webdriver.
Info Nokogiri can be painful to install on El Capitan. You can find help here.
Verify that you have the cucapp command in your PATH:
cucapp
Usage: cucapp [OPTIONS] -p PATH ...
Cucapp will use Firefox by default. If you want to use Chrome or Safari, you will need to install the relevant webdrivers: Chrome webdrivers and Safari webdrivers respectively.
The cucapp command only has one purpose at this time: to allow you to create a testing architecture for your Cappuccino Application.
Execute cucapp on the targeted application with the following command:
cucapp -p path/to/your/application
The command will create a folder named features in your application. This folder contains default Cucumber steps and utilities to easily create tests for your application.
A new task will be added to your Jakefile as well. The command jake cucumber-test will launch the Cucumber tests of your application.
Note that the category CPResponder+CuCapp.j has been added as well. This category adds the property cucappIdentifier to the CPResponder class.
To explain how Cucapp works, we are going to test the application created in the tutorial Xcode Interface Builder. You can find the source for this application here.
Unzip the file AdvancedHelloWorld.zip and launch the command below:
cd AdvancedHelloWorld
capp gen -fl .
nib2cib Resources/MainMenu.xib
As described above we begin by executing the cucapp command to set up Cucapp for the project:
cucapp -p path/to/AdvancedHelloWorld/
You should see the folder features in AdvancedHelloWorld.
First we need to make a few modifications to the AppController. We need to import the category CPResponder+CuCapp.j and set cucappIdentifiers for our CPTextFields. This allows us to identify the CPTextFields in tests.
/*
 * AppController.j
 * AdvancedHelloWorld
 *
 * Created by You on December 8, 2011.
 * Copyright 2011, Your Company All rights reserved.
 */

@import <Foundation/CPObject.j>

@import "CPResponder+Cucapp.j"

@implementation AppController : CPObject
{
    /* this "outlet" is connected automatically by the Cib */
    CPWindow    theWindow;

    /* We create the outlets of the textfields here */
    @outlet CPTextField myTextField;
    @outlet CPTextField myLabel ;

    /* As you can see, the label is also a CPTextField, it's just not editable and not bordered.
       It is important you declare correctly the class names of the outlets, or Xcode, won't see them.
    */
}

- (void)awakeFromCib
{
    /* This is called when the cib is done loading.
       You can implement this method on any object instantiated from a Cib.
       It's a useful hook for setting up current UI values, and other things.
       In this case, we want the window from Cib to become our full browser window
    */
    [theWindow setFullPlatformWindow:YES];

    [myTextField setCucappIdentifier:@"myTextField"];
    [myLabel setCucappIdentifier:@"myLabel"];
}

- (IBAction)sayHello:(id)aSender
{
   /* We get the content of the textfield
      and we set it as the value of the label
   */
   [myLabel setStringValue:[myTextField stringValue]];
}

@end
Now, we need to write our test. The test will be very simple: we will simulate a user typing the word Cucumber, then hitting enter. Finally we will confirm that the word Cucumber is shown in the label.
To do this, open the file test_application.feature in the folder features and modify it as shown below:
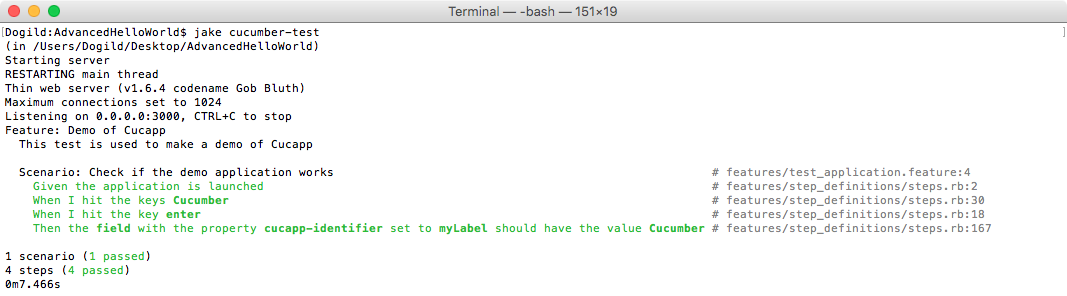
Feature: Demo of cucapp
This test is used to make a demo of cucapp

  Scenario: Check if the demo application works
    Given the application is launched
    When I hit the keys Cucumber
    When I hit the key enter
    Then the field with the property cucapp-identifier set to myLabel should have the value Cucumber
These steps are provided by the ‘abstract steps’ layer of Cucapp. More default steps (click, drag and drop, scrolling etc.) are available. You can find the full list in the documentation of Cucapp.
Launch the tests like this:
jake cucumber-test
Et voilà! If everything worked as expected, you should have seen Cucumber open the browser, perform the actions specified. The results shoulw have been shown in the terminal.
In the previous example, we used the “abstract steps” layer of Cucapp to write our test. Maybe you don’t want that. Maybe you want to be in control to know and understand what you are doing in your steps. If tht’s the case: good news, Cucapp gives you the possibility to write your own steps as well.
Let’s create a variation of the previous step which clicks a CPTextField and enters the value Cucumber.
Feature: Demo of cucapp
This test is used to make a demo of cucapp

  Scenario: Check if the demo application works
    Given the application is launched
    When I click on the editable text-field and enter the value Cucumber
    Then the field with the property cucapp-identifier set to myLabel should have the value Cucumber
Then, in the folder features/step_definitions, create a new file my_steps.rb and modify it as below:
When /^I click on the editable text-field and enter the value (.*)$/ do |value|
  # Here we tell the app to simulate a click on the CPTextField with the property cucappIdentifier set to myTextField
  app.gui.simulate_left_click       "//CPTextField[cucappIdentifier='myTextField']"

  # Here we tell the app to simulate keyboard events with the value got in parameters
  app.gui.simulate_keyboard_events  value

  # Here we tell to the app to simulate a newline character keyboard event
  app.gui.simulate_keyboard_event   $CPNewlineCharacter
end
As you can see, we just tell Cucapp to simulate actions. The object app provides an API to simulate everything that a user could do!
You can find the source of this demo here.
If you have suggestions for improvements to this guide, or if you have questions that haven’t been answered here, please let us know on gitter.

![]() Logo by Sofa. Hosted by SlevenBits. Copyright © 2013-2019 - Cappuccino Project.
Logo by Sofa. Hosted by SlevenBits. Copyright © 2013-2019 - Cappuccino Project.